

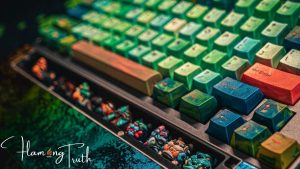
How to clean a mechanical keyboard?
Apparently, many of you are probably wondering how to clean a mechanical keyboard?
So, you are on the right page! Indeed there is a solution for any problem, you might be sick of using the old crumby keyboard which is full of dust and particles but you don’t have to worry!
Therefore, we are here to offer you the most demanding solution to your issue. Here is how you can convert your old keyboard congested with dirt and particles into a shiny new one.
5 Ways to clean a mechanical keyboard:
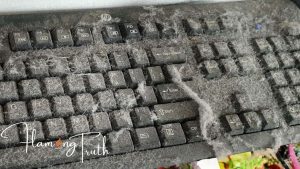
Whether you are working remote or locally, your main weapon is a keyboard and its Maintenance is the tackiest task to do, and when there is a thing to clean that is old, dirty with pet hair, etc, we might get into a lot of trouble and in these difficult moments, we only need a solution to handle it.
The advance and more reliable ways to clean the filthy keyboard are here: Please have a look!
- Smooth Cleaning through Wipes
- A deep cleaning by using Vacuum
- Advanced Cleaning by using Ultrasonic Cleaner
- Tricky cleaning by Cotton buds
- Thoroughly Cleaning by removing caps
1. Smooth Cleaning through Wipes:
If your keyboard’s only keys are dirty, you can pick up this method. This will help you in making your keyboard looks shinier. For this method, you can go through these steps. They are easier and convenient.
- Unplug your mechanical keyboard because if your keyboard is plugged in there is a lot of chances you might catch a current.
- Wipe your mechanical keyboard with a bit of damp cloth or you can use baby wipes instead.
- Then use another cloth to dry your keyboard. Don’t use paper or tissues, they might get stuck in between the keys and it will end up causing a lot of trouble for you.
2. Deep cleaning by using Vacuum:
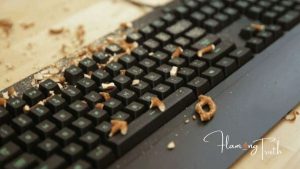
In this method, you have to use a portable vacuum. The compressed air Vacuum cleaner will catch up on those Cheetos and dirt particles in between your keys.
- Firstly, unplug your keyboard which is mentioned in the previous method.
- Pick a portable vacuum to remove dust or any shed particles.
- The narrow nozzle of the cleaner should be gently positioned between the keys by focusing each key on the right target.
- After you finish, use a microfiber cloth to wipe away any remaining residue.
Avoid hot air, it will damage the keys. Always use cold air for better results.
3. Advanced Cleaning by using Ultrasonic Cleaner:
An ultrasonic cleaner is a device in which millions of tiny bubbles are generated when an ultrasonic sound is passed through it. Then these tiny bubbles create great pressure for finer cleanse. For mechanical keyboards, we can also use an ultrasonic cleaner for advanced cleaning. It should be a part of your cleaning kit.
Here are the simple steps which can be used for advanced cleaning:
- Take your keyboard out of the socket.
- Remove the sticky switches of the mechanical keyboard by keycap puller or in case if your keycap puller is missing, you don’t have to worry, you can make your own keycap puller by turning the paper clips into a U-shape.
- After removing the keys, place them into an ultrasonic cleaner, and fill it with water.
- Add two denture tablets to it and run the machine for about 10 minutes.
- After that, dry the keys in a way that the key’s inner side will go upward.
- Carefully, cleanse the keyboard case with a microfiber cloth.
- At the end assemble the keyboard by placing its keys in the right place.
Read Moer : 5 Amazing Benefits of Drinking Water
4. Tricky Cleaning by Cotton buds without removing keycaps:

Most of the keys are hard to detach (space, enter, shift, etc.), So we have the most simple yet smart method for weekly cleaning.
- Unplug your keyboard.
- Pick a jar and put some water and dish soap in it.
- Dip the cotton bud in a jar.
- Wipe in between the keys.
- Then with the help of a damp cloth clean the keys.
5. Thoroughly Cleaning by removing caps:
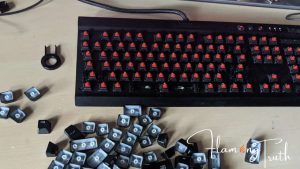
This is the best solution to spill, removing the dirt, dust, and sugary particles in between the keys because it doesn’t require any tools. It is a slower but thoroughly cleaning method because it cleanses grime and dust by root.
However, this method will only need a cloth, water, toothbrush, dish soap, and a jar. We can also use alcohol but it is not a reliable method that’s why we don’t recommend you this one.
So, these are the steps for thoroughly cleaning by removing caps:
- Unplug your keyboard.
- Remove keycaps with the help of the keycap puller smoothly. First, remove small keycaps to make space for large keycaps to remove easily without any hassle.
- Dip the keycaps in the water mixed with dish soap.
- Soak it for at least three hours for better results.
- Use a toothbrush to remove all the dust.
- Take the keycaps out of the water and dry them using a microfiber cloth.
- With the help of a microfiber cloth, clean the mechanical keyboard sheet.
- After drying, place the keycaps into their position.
These were the easy ways to clean mechanical keyboards, please let us know which method you like the most?


0 Comments